tattoos
Showing posts with label Donna Duffy. Show all posts

Tuesday, November 8, 2011

How Did Your Garden Grow? by Donna Duffy


Autumn is the perfect season to step back and reflect on the successes and challenges you experienced in your garden this summer. Grab your garden journal and take a walk around your yard. Jot down detailed notes – your memory may fade over the long winter months. Consider the following:


·      What did you love about the garden this year?
·      Which plants thrived? What did you do to help them thrive?
·      Which plants struggled? What happened to them? What were their precise growing conditions (e.g., how much water, what kind of soil, how much sun)?
·      What insect problems did you encounter? How did you manage those problems?
·      What plants outgrew their space?
·      What do you want to do differently next year?

With these notes in hand, you have several months to research answers to your specific plant problems. The CSU Extension website, http://www.cmg.colostate.edu/ has a wealth of information to help you get answers to your gardening questions. You’ll find downloadable fact sheets to shed light on your most perplexing issues and provide guidance.

The fun part of planning is considering all the options for adding or replacing plants. One of the best resources to find plants that thrive in the Rocky Mountain region is the Plant Select® website: http://www.plantselect.org. Plant Select® is a cooperative program administered by Denver Botanic Gardens and Colorado State University in concert with horticulturists and nurseries throughout the Rocky Mountain region and beyond. The purpose of Plant Select® is to seek out, identify and distribute the best plants for landscapes and gardens from the intermountain region to the high plains.

Jeffco Master Gardeners Kristin Sutton, Jamie Gallagher, Jan Skibinski and Ellen Goodnight
Fair warning: once you open the website, you may find the time slipping by as you click through the plant lists and photos. You can check out the Plant Select®  “winners” for the past year or previous years. You can create your own customized plant list based on your unique growing conditions. There are galleries of landscape designs as well as downloadable designs. You can look at individual plant photos and eye-popping photos of gardens that incorporate Plant Select® recommended plants. You can even find a list of retail suppliers of these marvelous plants.

Next spring, take note of the nearly 90 Plant Select® demonstration gardens to visit and view Plant Select® introduced and recommended plants in real-garden situations. A great place to start is the Jefferson County CSU Extension at the Jefferson County Fairgrounds, 15200 W. 6th Avenue.

Saturday, November 5, 2011

Are Your Roses Ready for Winter? by Donna Duffy


The arrival of fall brings the realization that winter really will be here soon. Among all of your other fall garden chores, be sure to plan some time to get your roses “tucked in” and ready to brave whatever winter may bring. According to the Denver Rose Society’s publication “Growing Roses in Colorado,” there are five basic steps to remember.


FIRST – Pick up and discard all the leaves that have fallen from the rose bushes. This is especially important if you have had mildew and/or blackspot. You can repeat this step in another month or so, when the roses are truly dormant and more leaves have fallen. This simple sanitation practice will decrease the likelihood of having the problem recur next year.

SECOND – You can stop deadheading your roses at this point. Some roses develop colorful hips after the last bloom, and you’ll miss them if take off all the spent blooms. In Colorado, it’s best to wait for Spring to do heavy pruning of roses. If you have some rose canes that are taller than 3’, you could top them off to prevent them from rocking in the wind or breaking off in heavy snow. Save any additional pruning for springtime.

THIRD – Water your roses well before the ground freezes. Watch the weather: if the temperature is likely to drop below 25 degrees, get the roses watered. Roots will suffer more from cold temperatures in dry soil than in damp soil.

FOURTH – Keep watching the temperature. When it drops to about 22 degrees in your yard for a few nights, it’s time to cover the crown area of each bush with a few shovels full of soil. Add mulch for additional protection. If you live in a windy area, you might use a rose collar to hold the mulch in place (purchase them at garden centers).

FIFTH – Check the roses for moisture content every couple of weeks during late fall and winter. If the temperature will be 45 degrees or warmer for six hours, watering can be done. Dig down with your trowel for 4-6 inches to test the soil moisture.

These simple steps will help your roses survive the winter weather and be ready to delight you in the springtime!

For more information about rose care or for additional yard/gardening information, call the Jefferson County CSU Extension at 303-271-6620. You can also visit the website of the Denver Rose Society.

Saturday, January 1, 2011

Christmas Tree Recycling by Donna Duffy

That lovely, fragrant cut tree you bought weeks ago has probably seen better days by now. It’s time to get it out of the house! Following are some options for recycling the tree once you’ve removed all of the decorations and tinsel. One caution: don’t burn the tree in your fireplace – the pitch content in the bark and needles can cause them to burst into flames from the intense heat.


Treat the birds!
Take that dry tree outside! You can prop it up against the house or leave the tree stand in place. Decorate it with popcorn, fresh cranberries, peanuts in the shell, pine cones with suet and birdseed; apples, rice cakes, or dried corn bundles. The birds will love the variety of treats – as will the squirrels. Use natural string, ribbon and raffia for hanging the edible decorations. The birds will use this material for nesting in the spring.

Use the Tree Boughs for Mulch
Recycle the boughs and use them as mulch in your own yard. Just cut the boughs off the trunk or larger branches and place them on your perennial beds. The boughs will protect dormant plants from drying out as fast as if they were fully exposed. They'll also keep the plants dormant longer because the soil temperature won't rise as quickly on sunny winter days. Be sure to remove the boughs as the plants start to emerge from dormancy. Then chop boughs into small pieces and add them to your compost pile to provide some acidity.

Recycle Your Whole Tree
Jefferson County has several sites where Christmas trees can be dropped off. This website will be helpful to find the location nearest to you: http://www.recycleyourchristmastree.com/counties/jefferson.html.  Before you take your tree, find out if there are restrictions. Many sites will not accept flocked trees and all sites require thorough removal of decorations to protect both man and machine in the recycling process. The best rule of thumb is to take your tree to the recycler in the same condition that you would find it in the forest. Then go back and pick-up some mulch for your garden! Pine needles are great for protecting fall planted materials, and bark chips are perfect for informal walkways.


City of Golden Tree Recycling
The City of Golden will be accepting holiday trees for recycling beginning Sunday, Dec. 26 through Sunday, Jan. 23. Trees may be dropped off at any time between these dates at the Golden Recycle site, just west of Hwy 93 and north of Golden Gate Canyon Road. Please leave holiday trees at the south end of the site where a sign announcing the recycling will be visible.
Trees must be stripped of all ornaments, hardware, strings of lights and tinsel. Mulch from the chipping process will be available for free at the public pickup site on 11th Street, just west of the Clear Creek History Park. For further information please contact the City of Golden Forestry office at 303-384-8141.

Rooney Road Recycling Center
Tree recycling is available to residents of Arvada, Edgewater, Golden, Lakeside, Morrison, Mountain View, Wheat Ridge and unincorporated Jefferson County. The Center is located at 151 South Rooney Road. Winter hours are: Wednesday, Friday and Sunday, 10:00 am – 3:00 pm. On Saturdays, the Center is open from 8:00am till 4:00 pm. There is a charge of $1 for single trees. For more information, call 303-316-6262.

Tuesday, November 30, 2010

Fall and Winter Watering by Donna Duffy


We are on track for one of the warmer autumns on record. In addition, we know that Colorado winters can have long spells of dry, warm and windy weather. During the cold weather seasons, pay special attention to weather and soil conditions and provide supplemental water to keep the root systems of trees, shrubs, lawns and perennials alive and healthy. Here are some tips to help them survive the winter.


General Tips
Apply water in mid-day when the air and soil temperatures are above 40°F and there is no snow cover. If the root systems don’t receive adequate water, the plants could appear normal in the spring, but may be weakened and die off in the summer when temperatures rise. Lack of winter water may also create insect and disease problems. Whenever you water, remember to disconnect the hose when you are finished!

Trees
Newly planted trees are most susceptible to winter drought injury. All trees utilize water most effectively when it is allowed to soak into the soil to a depth of 12”. Whether you use a sprinkler, deep root watering device or soaker hose, be sure to apply water to many different locations below the tree and beyond the canopy of branches. Trees need 10 gallons of water for every inch of trunk diameter (measured at knee height). If you use a deep root needle, insert it only 6-8” below the ground – if it’s deeper than that, it’s out of reach of the tree roots.

Shrubs
Even established shrubs will benefit from winter watering in dry years. Apply five gallons of water for small shrubs (less than 3’) and 18 gallons for larger shrubs. If the shrubs are newly planted, water twice monthly. Mulching the shrubs will help them retain moisture.

Roses and Other Perennials
If you planted perennials in the fall, they probably didn’t have much time to establish a strong root system and they will need winter water. Water when the ground appears dry by checking the soil condition 2-3” deep.  All perennials that are in a windy or southwest location will benefit from supplemental water. Keep an eye on the mulch around your perennials, it’s often blown around in the winter and will need to be put back in place or supplemented.

Lawns
Lawns can suffer winter damage as well as trees, shrubs and perennials, especially newly established lawns. These new lawns will need supplemental winter irrigation following the general tips above. During dry winters, lawns are more susceptible to winter grass mites and dessication if occasional winter irrigation is not applied.

Friday, November 5, 2010

What to do with all those leaves? by Donna Duffy


We have had weeks to enjoy the beautiful fall foliage, and now we have to figure out what to do with all those leaves carpeting the lawn and yard. It’s best not to leave a thick layer of leaves on the grass for several reasons. A thick layer can block sunlight, reducing turf growth because of the shading effect. That thick layer will also hold moisture, increasing the potential for turf disease. Here area some options for managing all those leaves and keeping them out of the landfills.

 Composting
Leaves are high in carbon, making them a great compost, but they are comparatively low in nitrogen and that’s what decomposing bacteria feed on. You can add nitrogen in the form of fertilizer or fresh green organic matter. Add ¼ to ½ cup of standard lawn fertilizer (without weed killer) per bushel. Or add one part dry leaves with two parts fresh grass clippings or other green garden debris. As you add leaves to the compost pile, moisten them until they are the consistency of a wet sponge. Whole leaves are better for compost than leaves that are shredded or mulched. For more information, check out the CSU Extension Fact Sheet “Composting Yard Waste” at http://www.ext.colostate.edu/pubs/garden/07212.html.

Mulching
Mulching the leaves directly into the turf is simple and a time-saving way to manage leaves. Mulching mowers work best, but almost any rotary mower will suffice. Use safety goggles and an air mask over your mouth and nose to protect yourself from debris and dust (dry leaves mulch better than wet leaves). Set the mower blade at your normal mowing height. If you have lots of leaves, it may require more than one pass. The finer the leaf particles, the more easily they fall into the turf, leaving the grass exposed to sunlight. This is important because fall is an important time for the turf to photosynthesize and store carbohydrates.

Recycling
In Jefferson County, bagged or loose leaves can be taken to the Rooney Road Recycling Center at 151 South Rooney Road. There is a charge for dropping off leaves and other yard waste, but it keeps them out of the landfills. If you take bagged leaves, you’ll need to take them out of the bags at the recycling site. Rooney Road Recycling Center is open 7 days a week except holidays. For more information, call 303-612-6262.

Some municipalities in Jefferson County have their own leaf collection programs. In Golden, yard waste collection will happen the first three Saturdays in November. Call 303-278-8600 for details.  Littleton and Englewood are continuing their annual leaf recycling program at Mountain States Wood Recyclers, 2300 West Radcliffe Avenue in Sheridan. For more information, call the Public Service Department at 303-795-3863.

 Call your local municipality to check on leaf recycling programs this fall. So, don't "leaf" them alone, compost, mulch or recycle!

Friday, October 1, 2010

Preparing Roses for Winter by Donna Duffy


It's October!  Ready or not, winter really will be here soon. Among all of your other fall garden chores, be sure to plan some time to get your roses “tucked in” and ready to brave whatever winter may bring. According to the Denver Rose Society’s publication “Growing Roses in Colorado,” there are five basic steps to remember.


FIRST – Pick up and discard all the leaves that have fallen from the rose bushes. This is especially important if you have had mildew and/or blackspot. You can repeat this step in another month or so, when the roses are truly dormant and more leaves have fallen. This simple sanitation practice will decrease the likelihood of having the problem recur next year.

Rose Hips

SECOND – You can stop deadheading your roses at this point. Some roses develop colorful hips after the last bloom, and you’ll miss them if take off all the spent blooms. In Colorado, it’s best to wait for Spring to do heavy pruning of roses. If you have some rose canes that are taller than 3’, you could top them off to prevent them from rocking in the wind or breaking off in heavy snow. Save any additional pruning for springtime.

THIRD – Water your roses well before the ground freezes. Watch the weather: if the temperature is likely to drop below 25 degrees, get the roses watered. Roots will suffer more from cold temperatures in dry soil than in damp soil.

FOURTH – Keep watching the temperature. When it drops to about 22 degrees in your yard for a few nights, it’s time to cover the crown area of each bush with a few shovels full of soil. Add mulch for additional protection. If you live in a windy area, you might use a rose collar to hold the mulch in place (purchase them at garden centers).

Rose Collar

FIFTH – Check the roses for moisture content every couple of weeks during late fall and winter. If the temperature will be 45 degrees or warmer for six hours, watering can be done. Dig down with your trowel for 4-6 inches to test the soil moisture.

AND IN THE SPRING…don’t be overly anxious to scrape off the mulch and prune the rose canes! Watch this blog for Spring pruning information. 

Tuesday, September 7, 2010

Late Summer in Your Garden by Donna Duffy

It’s September, and Colorado gardeners are busy harvesting their vegetables and enjoying the last blooms of summer. Before all the fall gardening chores kick in, here are some simple September tasks to tackle.


Store Seeds
In Colorado, all vegetable and flower seeds will store on a shelf at room temperature for at least one year without significant loss of germination. The most important factors in determining how long seed can be stored are seed moisture and storage temperature. The drier the seeds are, the longer they will store. Drying seeds in the shade is better than in direct sunlight. Never use a microwave oven to dry seeds. You may use a conventional oven if you keep the door open and the seed is not heated to more than 100 degrees. Package the seed in moisture-proof containers and store it in a refrigerator or deep freezer. Use sealed cans or jars rather than plastic bags.

Harvest Lavender
Harvest lavender stems in the morning when the oils are the most concentrated and at least 50% of the flowers are opened. Use pruning shears to cut the lavender stems as long as possible. Form bundles of 50 to 100 stems and secure them with rubber bands (they will contract as the stems dry out). Dry the harvested lavender in a cool, dark place where there is good air circulation.

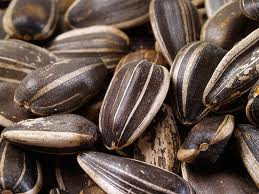
Harvest and roast sunflower seeds! Sunflowers are mature when the back of the head turns yellow and the seeds take on a brownish tinge. If birds begin to pick at the heads before they are mature enough to cut, tie a perforated plastic bag over the head. Pick the heads and hang them upside-down in a warm, dry place. When the head is dry, the seeds separate easily. Be sure the seeds are fully dried before putting them in air-tight containers for storage.

Sunflower seeds can be roasted by heating in a 300° oven for 15 -25 minutes. If salting is desired, soak seeds overnight in a brine of 2 Tbsp salt to 1 cup water. Boil the brine mix for a few minutes and drain. Spread seeds thinly on a cookie sheet and roast in a 200° oven for 3 hours or until crisp. Enjoy! (Source: Planttalk Colorado #1828).

Start a gardening journal. Use it to record what worked this summer, what you want to change, new plants you’d like to try…anything that is fresh on your mind at the end of the gardening season.  Be specific rather than general: for example, “eliminate Primrose and Valerian in front garden” will be more helpful than “get rid of invasive plants.”  If you are like many of us, those details get lost in the hustle-bustle of the holidays and the long, cold days of winter. In the springtime, your journal will be a bridge between fall and spring, and will help you jump start the new gardening season.

Thursday, August 5, 2010

Hot Weather Garden Problems by Carol King and Donna Duffy

The Dog Days of summer are here. The Greeks and Romans believed the dog star Sirius, a prominent star in the August heavens,  was the cause of the hot, sultry weather. They considered this to be an evil time "when the seas boiled, wine turned sour, dogs grew mad, and all creatures became languid, causing to man burning fevers, hysterics, and phrensies" according to Brady’s Clavis Calendarium, 1813.
It’s also the time in the garden when hot weather causes all sorts of calamities as well and gives gardeners fevers, hysterics and phrensies!  Be on the lookout for these problems.

The lawn is getting brown! The lush green grass from spring is starting to dry up with the hot days. If your lawn is Kentucky bluegrass (very common in landscaping) this slowdown is a natural part of the life cycle. Tip #1: mow to a height of 2.5 to 3”, and return the mulched clippings back to the lawn. Tip #2: fertilization is typically not necessary from July to early August. Wait to fertilize until late fall while the grass is still green. Tip #3: when a lawn looks thirsty, a common mistake is to increase the watering time. When using a standard sprinkler system with pop-up heads, eight to ten minutes is about the optimal time any one turf zone should run so run-off doesn’t occur. The full cycle may need to be repeated two or more times depending upon rain, humidity, wind and heat in the environment.

Yikes! Spider mites! Spider mites are common pest problems on many plants around yards and gardens in Colorado. Damaged areas typically appear marked with many small, light flecks, giving the plant a somewhat speckled appearance. You might also see webbing. Tip: few insecticides are effective for spider mites and many even aggravate problems. Instead, try a periodic hosing of plants with a forceful jet of water to physically remove and kill mites, as well as remove the dust that collects on foliage and interferes with mite predators.

Leaf scorch. During the hot days of summer, many trees, shrubs, flowers and vegetables develop dry, brown leaf margins. Once leaf scorch has occurred, there is no cure. The dehydrated portions of the leaf will not turn green again, but with proper water management, the plant may recover. Tip #1: during the growing season, water deeply and infrequently. Resist the urge to water more frequently. Tip #2: in the winter, give the plant a deep watering once a month when there is no snow cover. Tip 3: avoid overfertilizing. Fertilizer spikes, that deliver concentrated salts at specific sites, can burn roots and contribute to leaf scorch.

Pollination issues.  Many summer vegetables must be pollinated by insects such as bees to set fruit, During hot weather, pollen doesn’t remain viable very long. As a result there may be a drop in vegetable production for several days during and after hot spells even if bees are present. There may be more misshapen fruit as a result of poor pollination.

Blossom drop. Temperatures in the nineties cause many vegetables to drop their blossoms before fruit forms. Squash, zucchini, tomatoes, and beans are especially prone to this. Over fertilizing and under watering also contribute to blossom drop. Tip #1: To minimize blossom drop during a heat wave, keep your garden well watered by applying around 1” of water per week if it does not rain. Tip #2: avoid high nitrogen fertilizers.  Tip #3: Mulch the vegetables to conserve moisture and keep soils cool.

Blossom end rot. Another problem that is common in hot weather is blossom end rot (BER). This disorder occurs when there is not enough calcium available to developing fruit, resulting in the lower end of the fruit turning tan or black and failing to develop. BER is most common in tomatoes, but also occurs in eggplant, peppers, watermelons, and squash. The most common causes are uneven watering, over fertilization, extreme temperatures, and low soil pH (acid soil). Tip #1:  keep vegetables evenly moist. Do not allow them to dry out during dry spells. Tip #2: do not over fertilize with high nitrogen fertilizers.

If you have other “phrensies” in the garden, call the Jeffco CSU Extension Office at 303-271-6620.  We’ll get through this together!

Tuesday, June 29, 2010

Keep Those Summer Blooms Coming! by Carol King and Donna Duffy

Late June and early July are rewarding times in the garden. The results of all the hard labor in the spring are beginning to be evident: a variety of blooms make their first appearance. Those beautiful blooming plants will need some attention to keep the blooms coming back. Most perennials and annuals will benefit from deadheading, pinching, cutting back, and disbudding. It’s not as traumatic as it sounds, and you’ll be rewarded with a longer blooming season.


Deadheading: Deadheading is the practice of removing faded flowers. By removing spent flowers you keep the plant from setting seed and thus promote flowering. Not all plants need to be deadheaded. Some annuals have flowers that fall off cleanly by themselves. Other blooming plants such as daisy, black-eyed susan, daylily, marigolds, geraniums, zinnias, roses, and yarrow respond well to deadheading. Be sure to use a clean, sharp pruning tool. Don't deadhead if you wish to dry flowers, save seed, or want to save seed pods for drying. Toward the end of the blooming season, leave some seed heads intact for winter interest in your garden.

Pinching:
Pinching is done to promote bushiness and, consequently, more flowering. For most plants, all you need is your fingernails. You may give annuals a pinch at planting, and then pinch again later in the season to rejuvenate and encourage new growth. Perennials are pinched or pruned for the same reasons.  Some flowers that benefit from pinching include: asters, ageratum, browallia, calendula, coleus, verbena, zinnias and petunias. Timing is important: be sure to pinch your fall blooming perennials (like mums) before they start blooming. Pinch too late and you’ll find yourself bloomless and baffled in the fall.  

Cutting back: Cutting back certain plants after they flower will cause them to bloom one more time later in the season. Cut the flower all the way to the leaf on lady’s mantle, catmint, sages, salvia and sea hollies. This will feel more drastic than deadheading or pinching because you’re removing more of the plant. Be brave – it will be worth it.

Disbudding: The act of cutting off a perfectly good bud may seem a bit crazy, but doing so creates larger blooms from the remaining buds. Want a show stopping dahlia or a prize winning rose? Disbudding is the key. On dahlias, remove the two side buds next to the central bud at the end of each lateral branch. The flower that develops will be larger and will grow a longer and stronger stem. On hybrid tea roses, remove the secondary buds by the main bud; on floribundas and grandifloras, remove the middle (terminal) bud.


Friday, June 25, 2010

Summer Rose Care by Donna Duffy


All around town the roses are coming into bloom! Here are some tips to keep your roses healthy during the heat of summer. An excellent resource is “Growing Roses in Colorado” published by the Denver Rose Society. You can also get a wealth of information on their website at: www.denverrosesociety.org.

Fertilizing
If you want to stir up the conversation among rose growers, just bring up the topic of fertilization. There are many different opinions and lots of advice – and no real consensus on what is the best fertilizer for roses. Do some research: there are balanced rose foods, chemical fertilizers and organic fertilizers. A soil test will provide you valuable information about what ingredients need to be added to your soil. The first fertilization happens in spring, soon after pruning. Hopefully, you are past that stage. Continue fertilizing every 4-6 weeks, with your last fertilization in mid-August. Be sure to water your roses well before and after, and don’t be tempted to over-fertilize. In this case, more is definitely not better. If you have newly planted roses, go easy on them this year. Don’t fertilize at the time of planting – wait until you see new growth or the first bloom.

Watering
In general, roses are thirsty plants. Your summer watering regime will need to change with the weather, and will be influenced by your soil amendments, amount of sunlight received and drainage. The best way to determine whether your roses need water is to get down and dirty in the soil. If the top 2-4 inches of soil are dry, it’s time to water. Roses benefit from deep watering, down to 18”. A rain gauge can help you determine how much water you need to apply to achieve deep watering. Overhead watering can contribute to some rose diseases, so if you use that method, be sure to water early in the morning to allow the leaves to dry out before evening. Watering the soil with a bubbler or hose wand helps reduce the problems of wet leaves.

Mulching
Mulching your rose bed will help reduce soil temperature in the summer, conserve moisture and reduce the growth of weeds. Like fertilizers, there are many choices. Choose mulch that compliments your landscape, won’t blow away and won’t compact easily. Black plastic film is not recommended, but other non-organic mulches like gravel may be appropriate for your garden. Organic mulches will decompose slowly and enrich the soil – an added benefit. Apply your organic mulch to a depth of 3-4 inches. Straw is not recommended because it may contain weed seeds. Dried grass clippings can be applied in thin layers – but only if they have not been treated for weeds.

Deadhead!
Roses, like many other flowering plants, benefit from deadheading – or cutting back the spent blooms. On roses, cut back the cane to the point where it is pencil-thick, or to the place where the next 5-leaflet leaf occurs. Cut at an outward-facing eye to keep the plant from growing inward. Apply a cane sealer (I use Elmer’s glue) to the cane to help reduce insect damage at the point of pruning. And use sharp, clean pruners; shaggy cuts are an invitation to disease and damage.

Watch for Insects!
Most pest problems are managed best when caught early. Prevention of pest problems and disease starts with good horticultural practices. Clean up dropped leaves and blooms and prune out infested branches. A fantastic resource for managing insect problems is Whitney Cranshaw’s publication “Rose Insects – What are They Doing?” downloadable at: http://www.denverrosesociety.org/education/Cranshaw_RoseInsects.pdf

So go out there and make the world more beautiful by planting some roses!

Thursday, June 17, 2010

Take a Walk on the Wild Side by Donna Duffy

The wildflowers are spectacular right now,  and with the recent rain, will just be getting better! Grab your hiking boots and explore one of the many mountain parks in our area. You may see some of these lovely Colorado natives.


Look in moist areas for the beautiful foliage of this native from the Convallariaceae (Mayflower) family. It's Maianthemum amplexicaule, commonly known as False Solomon's Seal. I found this in the Boulder foothills, tucked away with with some ferns at streamside.

Look at the incredible bloom from the Hydrophyllaceae (Waterleaf) family. It's Hydrophyllum fendleri, commonly known as Waterleaf. Look for it in riparian woodlands, foothills and montane areas.

Most of us are familiar with this striking plant; it makes its presence known from a distance with its bright color. This is from the Scrophulariaceae (Figwort) family, and the genus is Castilleja. There are several species in Colorado, with a wide range of colors including pink, red, orange and greenish yellow.

If the bloom on this beauty looks familiar, you may have its cousin growing in your home garden. This is one of many varieties of Penstemon, also from the Scrophulariaceae (Figwort) family. This one is Penstemon secundiflorus, known as One-sided Penstemon. I've spotted it on almost every trail I've walked in the past few weeks.

Look for yellow trumpet-shaped bright yellow flowers, and you may have found Lithospermum incisum, from the Boraginaceae (Borage) family. Commonly know as Puccoon, it grows in dry areas on hillsides, in prairies and meadows.

To round out our color palette, see if you can find the pale blue flowers of Mertensia lanceolata, also in the Boraginaceae family. True to their dainty shape, these are commonly known as Chiming Bells.

Grab your boots, your camera and head for the hills or prairie! Colorado wildflowers beckon.

Wednesday, May 12, 2010

Veggie Gardening in Containers by Donna Duffy

The number of people who grow vegetables at home has increased dramatically over the past few years. But what if you are limited on space? Vegetable gardens require lots of square footage, don’t they? Well, not necessarily. Some vegetables will be perfectly content to grow in a container if a few basic principles are followed.

1.     Match the container with the vegetable you want to grow. Tomatoes do well in a large, deep container (at least 12”) that provides stability when the plant gets tall, and also has room for strong root growth. Beans, on the other hand, do well in a long box, at least 12” wide and 8” deep (choose pole beans). Carrots, chard, leaf lettuce, beets and peas all need a container that is at least 8” deep. Regardless what you are growing, make sure the container has never contained any kind of toxic material. Container veggies must have drainage. If your container doesn’t have holes, you could put a layer of rocks on the bottom of the container, and then plant your veggies in a container “insert” – a pot slightly smaller than the outside container. Be sure the insert has drainage holes. Remember: a larger container will make your veggies easier to care for and will allow you to provide a larger supply of water and nutrients.

2.     Be savvy about soil. Avoid using soil directly from your garden – it’s probably too full of clay and may contain pests that will cause problems later. Purchase potting soil at your local garden center instead. 

3.     Pick plants purposefully! Not all veggies are well-suited for containers. When you are shopping for veggies (or seeds), look for descriptors such as “compact”, “patio” “bush” or “determinate”. If you are planning on growing tomatoes, the following are good choices: Patio, Pixie, Tiny Tim, Saladette, Toy Boy, Spring Giant. The CSU Extension Garden Notes #724 has a long list of veggies appropriate for containers: http://www.ext.colostate.edu/mg/gardennotes/724.pdf

4.     Water, water, water! Growing vegetables in containers requires a bit more attention than growing ornamentals. The quality of most container grown veggies will improve if a constant supply of water and nutrients is provided. Without this, most vegetables will lose flavor, become tough, and perform poorly. In the heat of summer, your container may require watering every day (maybe even twice a day). Always apply enough water that the excess drains out. Avoid standing water by draining any saucers under the container (tip: use a turkey baster if the pot is too heavy to lift).

5.     Add nutrients.  Because the container will limit the root spread of your veggies, a regular supply of fertilizer is critical for maximum production. At the time of planting, add timed release fertilizer if the soil doesn’t already have it. Throughout the growing season, add soluble fertilizer according to label directions. More is not better! If you over-fertilize, you’ll have a lovely crop of leaves and stems instead of veggies.

Sunday, April 11, 2010

Spring Rose Care by Donna Duffy

It’s finally beginning to feel like spring! Your roses are probably showing signs of life again with canes turning green and buds starting to form. But this is Colorado, and we’re not out of freeze danger yet. With that in mind, the following are some steps you can take now to help your roses get off to a good start.


1.     Gradually remove the mulch from around the rose bushes. Don’t do this all at once, just remove a bit at a time, preferably in the afternoon. Gradual removal of mulch gives the plant time to adjust to the change in soil temperature. If you remove it all too soon, the new growth will freeze. If you wait too long, the tender new growth that has been protected will need some shading from the bright sunlight.

2.     Keep checking the beds for moisture. Dig down about 3 inches and test the soil by squeezing it in your hand. If it’s crumbly, you need to apply water. Water in the warmest part of the day during springtime. Later, in summer, your watering habits will need to change.


3.     Clean out the beds by removing any dead leaves from the canes and the ground. These old leaves can harbor diseases from the previous season, so get rid of them!

4.     In late April or early May, when the danger of freeze has subsided, you can prune your roses. Cut the canes all the way back to live wood. A correct pruning cut is about ¼ inch above the bud eye. Cut at an angle pointing toward the bud eye, and use sharp, clean pruning shears. Cut out any canes that are crossing over other canes. Cut any dead or diseased wood all the way to the ground or the graft. Seal the cut canes with a cane sealer or a dab of Elmer’s glue. Don’t be afraid of hard pruning in the spring; you are shaping the bush for good air circulation and healthy summer blooms.

5.     Bareroot roses can be planted as soon as the soil is workable. Soak them for 24 hours prior to planting. Mound up soil and mulch around the newly planted roses to prevent them from drying out.

A great resource for all kinds of information about growing roses is the Denver Rose Society’s “Growing Roses in Colorado”. This marvelous publication was updated in 2009 and is an invaluable resource. Check out the website at: http://www.denverrosesociety.org/


Friday, April 9, 2010

Health Hazards for Gardeners? by Donna Duffy


Gardening is great for your health, right? The benefits of gardening-related exercise are well known. Lesser known are some serious health hazards that you could encounter. Remember,  your physician is always your first line defense and should be consulted anytime you have symptoms that are concerning.

Gardening, yard work and landscape injuries can be as simple as a scrape or as severe as a deep puncture wound, but any that break the skin can leave you at risk for tetanus, a serious and potentially fatal bacterial disease. According to the Centers for Disease Control and Prevention (CDC), almost one-third of reported tetanus cases come from gardening or farming injuries.
The first signs of a tetanus infection include headache and muscle spasms of the jaw. The tetanus booster shot is an effective means of prevention and should be administered every 10 years. If you can’t remember the last time you had a tetanus shot, it’s probably time you got the booster – check with your physician.


Tetanus isn’t the only disease that poses a threat to gardeners. Sporotrichosis, also known as the “rose thorn disease” is an infection caused by a fungus found in vegetation. It usually infects the skin of people handling thorny plants, sphagnum moss or baled hay. The fungus enters the skin through small cuts or punctures from thorns, barbs, pine needles, splinters or wires from contaminated sphagnum moss, moldy hay or other plant materials or soil. The infection appears as small painless lumps or bumps resembling an insect bite 1-12 weeks after exposure. The infected site can be red, pinkish or purple in color. The bump usually appears on the finger, hand or arm where fungus first entered through a break in the skin. This is followed by additional bumps that can break open and resemble boils.  Eventually, they look like open sores that are very slow to heal. These symptoms call for an immediate visit to the doctor.

Even more dangerous than tetanus, though far more rare, is the possibility of a deadly pathogen traveling in consumer-grade fertilizer. Over the years there have been a few isolated cases of E. coli contamination traced back to a home garden fertilized with manure. Composting is effective in combating manure pathogens since it generates enough heat to kill many bacteria.

Your best daily defense against these diseases is to wear gloves and long sleeves, clean your tools after use, thoroughly wash anything you plan to eat, and scrub your hands when you’re through gardening. So, take precautions and go ahead! Get out there and enjoy all the positive health benefits of gardening.

Thursday, March 18, 2010

Not So Fast! Gardening Tips for Early Spring by Donna Duffy

Yes, it does feel a bit like Spring outside. And yes, there are signs of life in your yard and garden. As tempting as it is, don’t go full-force into your gardening mode quite yet. Following are some gardening chores you can start right now, and others that you’ll need to wait to begin.

Wait! It’s too early to do these chores.
Pruning roses – it’s just too early to do this now, even if the canes have signs of green. Pruning encourages new growth, and we aren’t out of danger of heavy snow and freezing temperatures. Wait until late April or early May, when the chance of freeze damage lessens. If you have tall canes that have broken unevenly, you can cut them just below the break to prevent them from flailing around in the wind and causing more damage. Do this sparingly.


Don’t remove mulch from your perennials or roses yet. They still need protection from cold temperatures. In fact, if the mulch looks thin in places, you might want to add more or move it back in place if the wind has blown it around.

Don’t assume that your lawn needs to be fertilized. Applying a high-nitrogen fertilizer in April may cause grass to grow too fast, before roots can grow to support the lawn. This makes a lawn less tolerant of summer heat. In most cases, an application of fertilizer in April is not needed when lawns were fertilized the previous fall or if clippings are returned to the lawn. If an April application appears to be necessary, apply the fertilizer at a reduced rate.
Dig in! Do these gardening chores now.
Prune trees and shrubs: Early March is a good time to prune deciduous trees and shrubs (except for birch, maple, walnut, and elm). Remove dead, dying, or unsightly parts of the tree, and branches that are crossed against each other. This is also a good time to prune fruit trees to ensure maximum fruit production. If you suspect that any branches are disease-infected, be sure to sterilize your pruning tools between every cut.


Cut back your ornamental grasses. Small grasses can be cut back with hand tools, on some of the larger grasses you may need to use a hedge trimmer. If so, it will be a dusty job – you may want to wear a nose/mouth mask.

If you didn’t cut back your perennials last fall, you can do that now. Carefully remove last year’s dead growth. Don’t be surprised if you see new growth under all those dead branches and leaves. Once the ground thaws, perennials can be divided and transplanted.


Aerating your lawn in the spring is more beneficial than power raking. It helps improve the root zone by relieving soil compaction while controlling thatch accumulation. Aeration removes plugs of thatch and soil 2 to 3 inches long (the longer, the better) and deposits them on the lawn.

SO! Get on out there and have some fun in the yard!

Monday, March 15, 2010

Growing Grapes for Wine? It's Time to Prune! by Donna Duffy

My neighbor, John Crawford, is a fourth generation vintner who has been growing grapes for about six years in Colorado, and making wine since 1979 using the private label “Crawford Castle. John was previously co-owner of Colorado’s oldest winery, Colorado Mountain Vineyards – now Colorado Cellars. Here's John's advice on pruning vines for maximum grape production. 

For first year vines, plant them within a few days of their delivery from the nursery and don’t do any pruning, just let them grow. This gives the vines a chance to build their root system and store carbohydrates, providing energy to grow strong trunks and canes.

Pruning starts in the second year. There will probably be several shoots growing from the main vine – when they are several inches long, find the strongest two and remove the rest. Some grape growers only keep one strong shoot, but John keeps two as a safeguard. Remove the side spurs, then tie these main shoots to a pole for straight growth. When a shoot gets about four feet tall, cut the top off to encourage side growth. One of the most difficult parts of growing grapes is pruning off all that growth in the second year – but don’t be sentimental! You are building the base for a strong, healthy grapevine in future years.

In the third year, intentional pruning is critical to control growth, promote healthy vines and provide an abundance of fruit. Grapevines are best pruned during the cold months of February and early March before the first buds emerge. If you miss this window of opportunity, wait until the leaves are fully developed to do your pruning.

Take these steps to prune your vines when they are at least three years old:
1) Follow a growing vine tip (called a spur) back to the older wood from the previous year. 2) Then, come forward leaving between four and ten buds and prune off the rest. John leaves three buds on every strong spur. 3) If you have weak, brittle spurs, cut them off. 4) Step back and take a look, your spurs should be about three inches apart. In future years, you’ll choose the three strongest spurs and they will be the base of your grapevine for the life of the plant.

Finally, a couple of pointers on fertilizing. If you are growing grapevines to harvest grapes, fertilizing is not really needed if your soil was amended with organic matter at the time of planting. However, if you are more interested in growing a leafy vine (as in a barrier), application of a high nitrogen fertilizer in April will result in lots of leafy growth.

Pruning grapevines is complex and multi-phased. An excellent resource is the Colorado Grape Growers’ Guide, downloadable at: http://www.ext.colostate.edu/PUBS/Garden/550a.pdf
 

blogger templates | Blogger