tattoos
Showing posts with label Gardener Janet. Show all posts

Sunday, January 30, 2011

Sunny and Warm in January by Janet Shangraw


Today is a spectacular day; one of the rare pleasures of January.  The temperature is in the upper 60’s, the sky is blue and I heard birds singing outside the window.  Welcome to Colorado!  Next week the temperature will plummet to the 20’s or below for most of the week. 

So today, I’m going to sit in the sun and contemplate how to make my front porch inviting when spring is here to stay.  For the past several years I have been experimenting with a white flower and foliage theme for potted plants that frame my entryway. 


By varying plant heights, foliage color, texture, and leaf shape the small, protected (shady) area of my porch becomes a peaceful sanctuary. A little water feature and white flowers to highlight the beautiful textures and colors of the foliage and you are done!

During the winter, look at magazines and seed catalogs to identify interesting textures and colors for plants.  I try to find as many colors of green in the foliage that I pick as possible. Here are two interesting plants that worked well last summer:

·       "Colorblaze Lifelime" coleus  has beautiful lime green foliage (part shade to shade) that grows 20 to 36 inches tall. 

coleus is behind the ornamental cabbage


·        Begnoia maculata var. Wightii is a shade-loving begonia with dark green leaves with white polka dots (yes, you read that right!).  The underside of the leaf is a deep red.  It has clusters of white flowers and grows 20 to 30 inches tall.  Mine is blooming still this winter (indoors, of course).  


Planting annual grasses in pots also gives nice texture and height.  A few large pots of white impatiens that fill in beautifully over the summer add a little spot of color, but don’t distract from the varieties of foliage.

Once spring is here and the nighttime temperatures are reliably above freezing, I bring my houseplants outside for a summer vacation.  Plant Talk article 1332 (click here to view article 1332) gives practical advice about caring for houseplants outdoors in the summer.  I bring my spider plants, peace lilies, and ferns outside.  They thrive in the summer and form the backdrop for the other plants that I purchase in the spring. 

Planting annual grasses in pots also gives nice texture and height.  I throw in a few pots of white impatiens that fill in beautifully over the summer and I’m done!

So enjoy the beautiful days when they come and do some planning.  Spring is on the way!

Thursday, September 2, 2010

Heirloom Tomato Tart by Janet Shangraw

Finally! It's time to harvest the heirloom tomatoes that I've been patiently waiting for all summer. I am so excited by the harvest of these beautiful varieties that I wanted to make a dish that would be just as interesting as the tomatoes. I have been experimenting for a couple of weeks with this tomato tart!


I planted Cherokee Purple, Green Zebras, and heirloom Roma tomatoes this spring. All three of these varieties are indeterminant tomato plants. Indeterminant plants have vines that keep growing through the growing season, extending fruit production until frost kills the vine. Plant size is typically large.
The Cherokee Purple tomatoes are a deep reddish purple color with a crown of green around the top when ripe. Be prepared for a pleasant surprise when cutting into a Cherokee Purple. When sliced, the flesh of the tomato is a very striking brick red color. This tomato has a very rich tomato flavor and is a little sweet. I am pretty pleased with this one.


The Green Zebra plant is very tall and prolific. The fruit is green with dark green stripes and is a little larger than a golf ball. The tomato turns yellow-green with green stripes when ripe. The inside of the fruit is also green. The taste is quite sweet.

The heirloom Roma (there was no variety name on the tag when I purchased it) has a very intense tomato flavor. I look forward to making sauce with this one!
The first time I made the tart I used only Cherokee Purple tomatoes. The next time, I only had one ripe tomato of each variety and I arranged them together on the tart. The combination of colors and shapes looked very interesting and the mix of flavors was wonderful. Serve with a simple mixed green salad for a great light, summer supper.

Heirloom Tomato, Basil and Ricotta Tart

Crust for 1 tart
(use 10" tart pan, or pie pan, or several individual tart pans)
1 ½ cups unbleached flour
½ tsp salt
½ cup butter/shortening
4 to 5 TBSP ice water
Place all ingredients EXCEPT WATER into food processor and blend. Transfer to mixing bowl and toss with ice water. Form into ball and roll between two sheets of waxed paper. Place crust into tart pan(s). Use roller to "cut" top from pan. Leaves a nice fluted edge.

Filling
3-4 heirloom tomatoes, thinly sliced
1 15 oz tub of ricotta cheese
2 slightly beaten eggs
½ cup basil leaves
2 Tbs fresh oregano
2 Tbs fresh parsley
1 tsp salt
Pepper to taste
1 cup shredded Parmesan cheese (Romano cheese would be fine too)
Parmesan for top of tart
Wash and dry the basil, oregano, and parsley leaves. Bunch all fresh herbs together and slice thin in strips. Add all filling ingredients and stir.
Spoon filling into tart pan(s). Arrange slices tomatoes on top of ricotta mixture. Sprinkle salt and pepper to taste on tomatoes, then add a little more shredded parmesan to top of tart.
Bake at 375 degrees F for 40 to 45 minutes.

Sunday, July 18, 2010

Hot Enough For Ya?? by Gardener Janet

OK, today was one of those July days we know is inevitable; but the first day each season that it really hits near that 100 degree mark – that’s when I make gazpacho.  Gazpacho is a traditional Spanish cold soup combining tomatoes, tomato juice, olive oil, and vinegar as well as finely chopped vegetables; nothing is cooked, only chilled in the refrigerator.  I first tasted gazpacho in Spain about 25 years ago.  Ah…….I ate so much that the acid in the vinegar burned my mouth…(so my advice is: don’t eat it at every meal except breakfast for two weeks). 
Nothing says summer is here better than a cold, healthy bowl of gazpacho on the first scorching day of the summer.  It doesn’t matter if your garden tomatoes are not quite ready yet, or you haven’t yet harvested the first cucumber.  The farmer’s market or grocery store can help out during this heat wave in advance of harvest!
I usually start with the recipe found in “Colorado Cache Cookbook” (look under Mexican food).  Then I adapt with what I have in the garden (or the refrigerator):

Gazpacho
    •    3 tomatoes, peeled (hint:  drop tomatoes in boiling water for about 30 seconds. Then place tomatoes in ice water…they are a snap to peel then).
    •    1 bell pepper (you pick the color.  I like yellow in gazpacho, traditionally, green is used)
    •    1 cucumber, peeled
    •    1 cup chopped celery
    •    ½ cup green onion
    •    4 cups tomato juice
    •    2 avocados, (chopped)
    •    5 tablespoons red wine vinegar
    •    4 tablespoons olive oil (extra virgin)
    •    1 tsp salt
    •    ½ tsp pepper
Chop all vegetables very finely.  Combine in a non-metallic bowl and chill (at least 4-5 hours).  The Spaniards make the soup minus the vegies and let you decide for yourself which ones to add from many small bowls of excruciatingly finely chopped vegetables.  In my house, they all go in the bowl (less mess to clean up).
Serve ice cold with a dollop of sour cream.  Croutons are also good on top!  Gazpacho is filling.  A side salad of mixed greens and you are done with dinner!
Bring on the heat!  I’m ready!!!

Friday, July 9, 2010

Tarragon…Pretty to Look at and Tastes Good Too! by Gardener Janet


As I wait for the vegetable garden to begin producing, it is fun to come up with new ways to use the herbs in my garden.  Tarragon (Artemisia dracunculus – or Dragon’s Wort) is a great perennial herb that nestles right into my perennial garden, providing interesting long, slender leaves and great texture.  It reaches about 2 – 3 feet in height and about 1.5 feet wide.  Tarragon is hardy in Colorado and grows in well-drained soils in full sun/part shade.   Leaves can be used fresh or dried and used in the winter in stews and soups.

Tarragon is most commonly used in chicken, fish and egg dishes, but I decided to try to jazz up a Father’s Day pasta salad with Tarragon.  Reviews around the table (including Dad, Morfar (means mother’s father in Swedish) and Uncle) were positive!


Macaroni Salad with Peppers and Tarragon Dressing

1 lb pasta (small shells or similar shape)
1red pepper
1 yellow pepper
1 orange pepper
1 small red onion
2 – 3 stalks of celery
¼ cup fresh tarragon (cut enough for the dressing below, too)

Champagne-Tarragon Dressing
1 Tablespoon Dijon mustard
1/3 cup champagne vinegar
1 clove garlic
¼ cup fresh tarragon
1/3 cup extra virgin olive oil
½ cup sour cream
¼ cup Hellman’s mayonnaise
¼ tsp celery seed
¼ tsp red pepper flakes
½ tsp freshly ground black pepper
¾ tsp mustard seed
½ tsp salt

Boil 1 lb of  pasta (small shells or similar shape) until al dente.  Drain. 

While cooking pasta, finely chop peppers, onion, celery (and/or any other fresh crispy vegetables you have on hand or in the garden…including peas, beans, brocolli, etc).

Make the dressing by placing the Dijon mustard, vinegar, garlic clove, salt, spices and tarragon into a food processor.  Pulse until well mixed.  Add olive oil through the feed tube.  Pour into bowl. 

The sour cream and mayonnaise are used to thicken the mixture so that it sticks well to the pasta.  You can vary those amounts according to your own taste. 

The dressing (without the sour cream and mayonnaise) is also great on a fresh salad. 

Toss pasta, vegetables and dressing together in the big pasta pot and transfer to a nice glass bowl (pretty colors should be seen, don’t you think?)  Chill (overnight is even better) and garnish with a few sprigs of tarragon.  Add salt to taste.

Monday, April 26, 2010

Vegetable Gardening Advice From a Pro by Janet Shangraw


We’ve had a few warm days, the grass is greening up, and the trees are beginning to bud. Gardeners may be dreaming of colorful spring blooms, but the serious vegetable gardener has not only been planning the vegetable garden for months, they have prepared the beds, organized efficient irrigation, have been carefully cultivating their own select plants from seeds for weeks now, and probably have their cold season vegetables already planted.

The gig is up.  Apparently, I am NOT a serious vegetable gardener.  I am simply gazing longingly at my garden, and starting to think about what I’d like to grow this year.  So for inspiration, I interviewed Boulder County Extension Agent Carol O’Meara who IS a serious vegetable gardener! 

Carol is the Boulder County Extension Agent specializing in Horticulture and Entomology, better known as the “Bug Babe”.  She has an extensive vegetable garden and harvests and processes foods each season to feed her family for the entire year. 

Carol’s Fun, Interesting Veggies to Try:
·      Green Doctors  - a cherry tomato that gets rave reviews!  This tomato consistently wins blind taste testings -  YUM.
·      Pacman Brocolli – cold season veggie that tastes much better out of the garden than from the grocery.  Carol says it has a nutty, sweet flavor.  Be sure to harvest before the florets on the main head are fully opened.  Then harvest from the side shoots which will produce smaller heads. 
·      Blacktail Mountain Watermelon – Performs well in the metro Denver area and tastes great.
·      Homegrown garlic – Carol says that she grows enough garlic “to feed a small Tuscan village”.  (Watch for a blog this fall about planting and using garlic from your garden!)

Most Common Pitfall for Novice Vegetable Gardeners:
‘Go Big or Go Home’ does not apply to beginning vegetable gardeners.  Carol warns about starting with a garden that is too large.  It can be overwhelming and before you know it, your garden can be inundated with weeds. 

Helpful Tips
·      Pay attention to soil temperature.  Be sure that warm season crops are not planted until the soil temperature is between 55 and 60 degrees F.  Cool season crops need soil temperatures between 45 and 50 degrees. Using black plastic around the plant can help warm the soil. The Wall-of-Water® also provides protection for plants. Check out CSU Extension’s Garden Notes for more information.
·    The right way to plant a leggy tomato…..this is a revelation for me! Plant it horizontally.  Yes, I know it sounds crazy, but it makes sense.  Dig a trench 2 to 3 inches deep.  Place the plant horizontal with only the top two or three sets of leaves showing above the soil.  Pinch off the lower leaves below the soil line before planting.  The plant will root out along the stem in the warm soil near the surface and provide better support for the mature tomato plant. 
·    As with any kind of gardening, soil preparation is key.  Amending the soil with compost is a top priority. Another helpful CSU Extension resource is Vegetable Garden: Soil Management and Fertilization.  
     You can find more information on deciding where to put the garden, what to plant, when to plant, when to harvest, information about raised bed gardens, container vegetable gardening and more on the CMG website.
   So now along with my usual herbs, zucchini and a few struggling tomatoes, I plan to venture out and try some ‘new to me’ varieties.  I can’t wait to start cooking from the garden again!  Thanks, Carol!!


Sunday, September 27, 2009

Fall Traditions by Gardener Janet

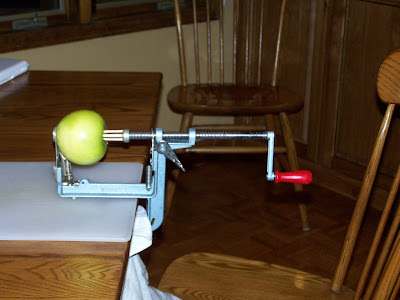
The air turns cooler; the apples on the backyard trees are ready for harvest. In our family, that means it is time to be baking apple pies. A few years back, my husband discovered a tool I had found at a garage sale. This simple tool had a profound impact on our family. The apple peeler-parer-slicer spoke to my husband who became obsessed with harvesting, and using every single apple produced on our two apple trees.
Needless to say, the rest of us needed to become competent at doing something with the buckets of peeled and sliced apples he was producing. Thus, the apple pie assembly line was born. My daughter became the “spice girl”; she would mix sugar, flour and spices to create the perfect pie filling. My job was the crust; I would make dough for a double crust over and over. On a good day we would make seven or eight pies. Neighbors, friends, and family were the recipient of these pies.

Apple pie recipes are a dime a dozen….but here is what happens on the assembly line.

7 cups of apples (peeled and sliced)
¾ cup sugar
2 Tbsp flour
1 tsp cinnamon
½ tsp ginger
½ tsp ground cloves
½ tsp nutmeg
Splash of lemon juice

Toss apples with spices and sugar.

Make a double crust.

2 cups unbleached flour
2/3 cup shortening
1 tsp salt

Mix these ingredients in a food processor. Pour this mixture into a bowl and add 5 TBS ice cold water. Mix with a fork and form into two balls. (Mixture may look very wet at first. Wait a minute or so and the moisture is absorbed). Place one of the balls in the center of a sheet of wax paper slightly larger than the pie pan. Cover with another sheet and roll out for bottom crust. Place in pie pan, add apple mixture. Dot with butter. Then roll out another circle of pie dough, place on top of apples. Fold top and bottom layers together to make an edge and crimp with your knuckles.

Bake at 400 degrees F. for 60 minutes.

Another favorite (when we run out of pie plates) is a quick, rustic looking apple tart:

1 cup unbleached flour
1 Tbsp sugar
½ stick butter

Mix these ingredients in the food processor. Place flour mixture into another bowl and add 3 TBS ice cold water. Lightly toss and form into a ball.

Roll out dough (using same wax paper method) into a large circle.

Filling:

2 large, tart apples (peeled and cut in half…no special tool used here)
Slice the apples from top of half (makes apple circles). When no more circles can be cut, chop the rest into bite sized pieces.

Arrange apples in center of pie dough circle. Start with chopped pieces and end by placing apple circles in a concentric pattern (leaving about a two inch edge of pie dough). Sprinkle with a mixture of 2 TBS sugar, 1 tsp cinnamon, ½ tsp ginger and cloves. Dot with butter. Fold edges toward the center. Bake at 400 degrees F. for 45 to 60 minutes (until pastry is golden brown). For the tart in the photo I made a caramel drizzle using several tsp of butter melted with a couple of tsp of brown sugar. Heat until dissolved and drizzle over baked tart.

Wednesday, September 23, 2009

Chicken With Sage and Proscuitto by Gardener Janet


There are many varieties of garden sage available. All prefer full sun and pests seem to leave the plants alone. These perennial plants grow quickly; they have beautiful foliage, blue/purple blossoms and the leaves taste and smell great.


You can use fresh sage in any recipe calling for dried sage. Two teaspoons of fresh sage can be substituted for one teaspoon of dried sage.

Try pinching several sage leaves from your plant, wash them and let them dry on a paper towel. Add a tsp or two of butter in a skillet and when melted, add the leaves gently turning until crisp. Take out and let cool. These crispy fried leaves are a burst of flavor. Crush them and add them to pasta, with salt and pepper and a little parmesan cheese.


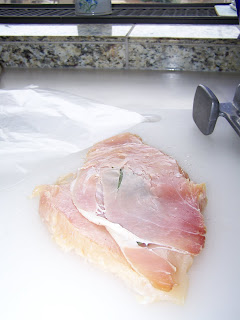
One of my favorite quick entrées is Chicken with Sage and Proscuitto. Take a boneless chicken breast and place a sage leave (or two) lengthwise on the backside of the chicken. Cover the sage with a thinly sliced piece of proscuitto ham. Pound the chicken with a mallet (place wax paper over the chicken/sage/proscuitto to keep from making a mess).


Sautee the chicken (sage/proscuitto side up) in extra virgin olive oil, turning when browned. Cook completely, and then remove from the pan to a heated serving plate. Meanwhile, deglaze the pan with red wine (pour wine in the pan and loosen the drippings from cooking the chicken). This will make a rich sauce that picks up the flavors from the chicken. Pour sauce over chicken and serve.


Wednesday, August 12, 2009

It’s Peach Season! by Gardener Janet


One of my favorite times of the year is when the peaches from the western slope of Colorado arrive at local farmer’s markets and grocery stores. They are here now and I’ve already been enjoying them with breakfast, for snacks and, well, all day long!

Last year we harvested hundreds of little sweet peaches from my neighbor’s peach tree. He didn’t know what to do with them all and we were happy to help out. Growing peaches in the high plains area of Colorado is certainly not without challenges. In fact, that bumper crop last year was the exception. Sadly, there are no peaches on the tree this year. Click here for the CSU extension website and a very helpful guide to growing peaches in the home garden.

Whether you get your peaches from the market or your garden, here is a recipe that a friend of mine, who was a pastry chef on Martha’s Vineyard, shared with me years ago.

Peach Cups

Slice 5-6 Peaches (3-4 cups)
Toss w/ 2 TBSP sugar and 3 TBSP flour
Place in 9x13 pan or 6 custard cups

Prepare a dough to place on top of the peaches.

(This is the secret my friend shared and it is true for all types of pastry: Mix the dry ingredients with the shortening (in this case, butter) in a food processor. THEN add the liquid by hand (whisking with a fork in a separate bowl).

Mix the following in a food processor:
1 ½ cups flour
1 ½ TBSP sugar
2 ¼ tsp baking powder
6 TBSP butter

Transfer this mixture for the dough into a bowl and toss w/ ¾ cup whipping cream using a fork until mixed (be sure not to mix liquid and processed ingredients in food processor)

Roll out dough to about ½ thick. Lay over the peaches in the 9 x 13 pan or cut out circles with a glass about the same diameter as the cups and place one circle on each cup of peaches.

Brush the tops with cream. If you are using cups, place them on a cookie sheet.
Bake 15 min at 350 in the lower 1/3 of the oven.

Wednesday, July 29, 2009

Zucchinis Take Over The World by Gardener Janet

(Note: I wrote this article just before the terrible storm that so devastated gardens in central Jeffco. I’m so sorry for those who have lost their gardens for the year. For those of you who missed the devastation, read on. For those who lost your veggies, like all gardeners everywhere, I am happy to share.)

Every year we plant them….every year we give them away by the shopping bag….What to do with all those zucchinis. Belonging to the species Cucurbita pepo, the prolific zucchini is wonderful sautéed in olive oil with onions, tomatoes, oregano and a little parmesan cheese.

While we were away on vacation, my very thoughtful neighbors have been harvesting in our absence and now, magically, there are loaves of zucchini bread in the freezer and still plenty of zucchinis left to enjoy.

So when you are tired of a side of sautéed zucchini on your plate every night, and the freezer is packed with enough zucchini bread (chocolate or otherwise) to last through the winter (and beyond) and the zucchinis are still producing, try zucchini pancakes. Pancakes easily use a large quantity of zucchini in a single recipe and are a great idea for when those zuchs get just a bit on the large size while hiding under a giant leaf.


Zucchini Pancakes

(this is a very adaptable recipe…double it, triple it, halve it depending on how much zucchini you have)

3 cups of grated zucchini (one large…but not gigantic zucchini)
1/2 onion, chopped
2-3 TBSP minced fresh rosemary leaves (adjust depending on your preference)
1 cup flour
½ cup parmesan cheese
1 tsp baking powder
2 eggs
Salt and pepper to taste

I use a food processor to first chop the onion, then change to a grating blade and grate the zucchini.

Mix the flour and baking powder in a separate bowl. Whisk the eggs. Add beaten eggs to the zucchini and onions and rosemary. Then add the flour and baking powder mixture. Stir until well blended. Let stand while heating a pancake griddle (or frying pan). Grease griddle or pan with several teaspoons of olive oil.

Mixture will initially seem quite stiff, but the moisture in the zucchini will then increase while you are waiting for the griddle/pan to heat and the mixture will become more pancake batter like.

Stir again, then spoon out mixture and cook until browned and crisp on both sides.

These are always a big hit at our house, and we typically have extra mouths at the table when they are served!

Press the Comment link at the bottom of this article to leave YOUR favorite zucchini recipe for other bloggers to enjoy!

Sunday, July 12, 2009

Lavender Tea Bread by Gardener Janet


I have heard about cooking with lavender, but I’ve never tried it. Years ago I saw a photo in a book called, “Herbs, Gardens, Decorations, and Recipes” by Emelie Tolley and Chris Mead, showing a delectable looking lemon tea bread. I had always wondered what would happen if I added lavender to that beautiful quick bread.


So this afternoon when the temperature dropped as an afternoon storm approached, I decided that it would be a good time to turn on the oven. I picked some fresh lavender flowers and started my culinary experiment.

Adapted from “Herbs”:

Lavender Tea Bread
Ingredients:
3/4 cup milk
2 Tbsp fresh chopped lavender flowers
2 cups all-purpose flour
1 1/2 tsp. baking powder
1/4 tsp. salt
6 Tbsp. butter, softened
1 cup sugar
2 large eggs
1 Tbsp lemon zest
Juice from 1 lemon
Powdered sugar

Grease a 9x5x3 inch loaf pan. Preheat oven to 325 degrees. Heat the milk with lavender almost to a boil, then steep until cool.

Mix flour, baking powder and salt together in bowl.

In another bowl cream butter and gradually add sugar, then lemon zest and eggs, one at a time, beating until light and fluffy. Add flour mixture alternately with lavender milk, in three parts. Mix until batter is just blended. Pour into prepared pan and bake for 50 minutes, or until toothpick inserted in center comes out clean. Let cool in pan 5 minutes, then remove to a wire rack to cool.

Make a simple sugar glaze with fresh lemon juice and powdered sugar. Add lemon juice to ¼ to ½ cup powdered sugar stirring until a thick but pourable paste forms. When completely cool, drizzle bread with sugar glaze. Garnish with sprigs of fresh lavender.

Looks beautiful….the taste is quite unique, and the aroma of lavender is very subtle. Fresh, and not too sweet. I think that it will be perfect with a tall, frosty glass of iced tea.

Friday, July 3, 2009

Baked Rosemary Risotto by Gardener Janet


The frenzy of spring planting is waning. The gardens are cleaned out and new perennials stuffed into available spaces, patio plants are bursting out of their pots after the second or third application of fertilizer, it is finally time to relax a bit and enjoy the fruits of our labors.

A pillar of Tuscan Blue rosemary sits in a pot next to the cushioned seat where I read the paper. As my arm grazes its pungent leaves, I loose track of the news and start to think about we could have for dinner.

How about grilled salmon, a nice salad with mixed greens, fresh basil, tomato and buffalo mozzarella, and maybe rosemary risotto? I use a recipe for baked risotto that is much less time consuming than traditional recipes. It is drier and has a firmer texture, but for easy summer meals or entertaining, it can’t be beat.

Baked Risotto

Preheat oven to 400 degrees

Ingredients:
3 ½ cups chicken broth
2 Tbsp chopped fresh rosemary leaves
4 Tbsp (1/2 stick) butter
1 onion, minced
2 cups Arborio rice
3 tsp crushed garlic (or 3 minced garlic cloves)
½ cup dry white wine
2 oz (1 cup) grated parmesan cheese
Pepper

Bring broth and rosemary to simmer in a medium saucepan over medium-high heat. Cover and keep the broth warm over the lowest possible heat.

Melt butter over medium heat. Add onion and cook until lightly browned, about 9 minutes. Stir in the rice and cook until the edges begin to turn translucent (about 3 minutes). Stir in garlic and cook until fragrant (about 15 seconds). Add the wine and cook, stirring frequently until it is completely absorbed (about 2 minutes).

Spread the rice mixture into a 9 x 13 inch baking dish. Pour the warm broth over the top. Bake until the rice is tender and the liquid is absorbed (about 25 minutes).

Stir in parmesan. Season with salt and pepper to taste.

Substitute the rosemary with sage, oregano, basil, or other herbs to serve with other main course dishes.

Back to the paper…..
 

blogger templates | Blogger